Tie Card
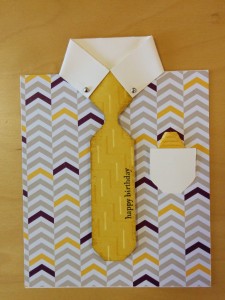
Here’s one for the lads! This shirt and tie card makes a great father’s day or birthday card but could also work as a congratulations card, for a new job or other special occasion.
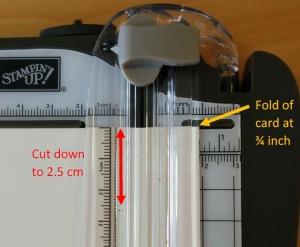 The base of the “shirt” is a 4 ⅛” x 11” piece of Very Vanilla cardstock, folded in half to create a top fold card. A little bit of tricky cutting is involved with this one: with card folded and the fold of the card at the ¾” mark of the trimmer, cut down to 2.5 cm. Flip the card over and repeat. Hopefully the pics will help explain better than words can. Press firmly with the trimmer blade so it cuts through both layers of the card.
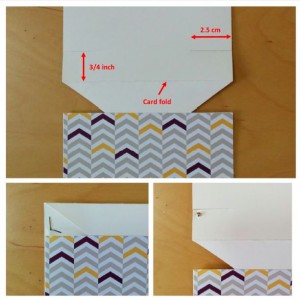
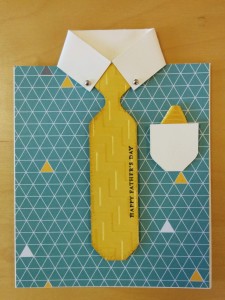
On one side of the card (this will be the front), cut out two triangles: start at the fold of the card and cut to the 2.5 cm mark created in the step above. Repeat for the other edge. Stick the DSP (which measures 4 ⅛” by 4 ¾”) onto the front of the card as shown. Two brads will be used mimic buttons in the shirt collar. Using the paper-piercing tool, create a hole in the corner of the collar as shown – be careful not to do this too close to the corner of the card otherwise the card may tear. Insert the brad from the back and try and angle the split pins so they’re at 90° so they stay out of the way.
 The tie measures 4 ⅛” by 1″ and the pocket is a 1″ square piece of Very Vanilla. To punch the tie, line up one edge on the Envelope Punch Board at 4 ¼” and punch. Flip the tie and repeat. Next, line up the newly shaped bottom of the tie at 3 ⅛” and punch. Flip the tie and repeat. The pocket is shaped in much the same way. Line the edge of the pocket at 1 ⅛” and punch, flip and repeat.
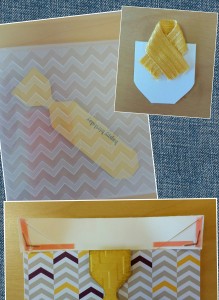
To decorate the tie, stamp your sentiment along the edge of the tie, emboss using the Big Shot and then sponge the edges. I’ve used the chevron embossing folder at an angle which gives the tie a nice, diagonal texture to it. The hanky in the pocket is made from a small (approx. 5 cm) piece of ribbon, folded as shown and stuck to the pocket with a couple of glue dots.
Using three dimensionals (for the top, middle and bottom of the tie) stick the tie to the front of the card, aligning it centrally and with the top of the DSP. Adhere sticky strip along the underside of the collar as shown, try to also stick down the split pins of the brads so they don’t move about. Fold the collar to the centre of the tie and stick down. Adhere the pocket in position with a dimensional and you’re done!
Probably one of the more fiddly cards I’ve done but well worth the effort. Many thanks to Ann, my upline, for teaching me how to make this one.
 About Astrid Bealing
I am an Independent Stampin’ Up! Demonstrator from Brisbane, Australia. I’ve always loved all things craft and finally taken the leap into demonstrating the wonderful products Stampin’ Up! sell, which I’ve been using since 2010.
I will be posting my Stampin’ Up! projects here to inspire you. I also hold monthly card and paper craft workshops from my home in Eight Mile Plains, and sell product Australia wide.